Practical, concise, and battle-tested notes for Java, Spring/Spring Cloud, databases, computer networks, OS, Redis, message queues, and distributed systems. I hope it can help you to know a little about java backend or help you to make a good preparation for the interview.
Based on SpringBoot, Handwritten Simple RPC Framework (Three)
Continuing from the previous chapter, after implementing server registration and invocation, the next step is to implement client functionality, which mainly includes load balancing, rate limiting, request sending, and service discovery. Next, we will implement the following features in the order of an RPC call process.
A single request:
Before implementing the client, it’s first necessary to consider what needs to be sent in a single request.
First, the current service name method name, as well as the corresponding parameters and parameter types, are needed, otherwise the server cannot perform the corresponding reflection call based on the request.
Second, the request should include the parameters within @RpcConsumer so that the server can locate the correct service.
Finally, the request should include a unique value for this request to facilitate traceability.
At this point, the basic parameters required for a request have been completed.
/** * generate service name,use to distinguish different service,and * can be * split to get the service name */ public String fetchRpcServiceName() { returnthis.getProject() + "*" + this.getGroup() + "*" + this.getServiceName() + "*" + this.getVersion(); }
}
Service Proxy
First step, during the Spring startup process, scan all classes annotated with @RpcConsumer to generate proxies. Subsequent calls to methods in these classes will invoke the proxy methods, which then initiate requests.
/** * proxy and injection of consumers * * @param bean * @param beanName * @return * @throws BeansException */ @Override public Object postProcessAfterInitialization(Object bean, String beanName)throws BeansException { Class<?> toBeProcessedBean = bean.getClass(); Field[] declaredFields = toBeProcessedBean.getDeclaredFields(); for (Field declaredField : declaredFields) { if (declaredField.isAnnotationPresent(RpcConsumer.class)) { RpcConsumerannotation= declaredField.getAnnotation(RpcConsumer.class); // build rpc service config RpcServiceConfigserviceConfig= RpcServiceConfig.builder() .project(annotation.project()) .version(annotation.version()) .group(annotation.group()) .build(); // create the proxy bean Factory and the proxy bean RpcServiceProxyproxy=newRpcServiceProxy(sendingServiceAdapter, serviceConfig); ObjectrpcProxy= proxy.getProxy(declaredField.getType()); declaredField.setAccessible(true); try { LogUtil.info("create service proxy: {}", bean); declaredField.set(bean, rpcProxy); } catch (IllegalAccessException e) { e.printStackTrace(); } } } return bean; } }
Next, in the invoke method of the proxy class, implement the assembly and invocation of the request. Simultaneously, retrieve the response value from the Future and return it to the caller.
/** * get the proxy object */ @SuppressWarnings("unchecked") public <T> T getProxy(Class<T> clazz) { return (T)Proxy.newProxyInstance(clazz.getClassLoader(), newClass<?>[] {clazz}, this); }
The core method of the client is to send requests, and there are multiple methods for sending requests. Here, only the implementation based on Netty’s Nio is demonstrated. Below is a complete sequence.
First, implement the send method, which should include the functionality of finding addresses and sending requests.
/** * Waiting process request queue */ privatefinal WaitingProcessRequestQueue waitingProcessRequestQueue;
publicRpcSendingServiceAdapterImpl() { this.findingAdapter = ExtensionLoader.getExtensionLoader(RpcServiceFindingAdapter.class) .getExtension(ServiceDiscoveryEnum.ZK.getName()); this.addressChannelManager = SingletonFactory.getInstance(AddressChannelManager.class); this.waitingProcessRequestQueue = SingletonFactory.getInstance(WaitingProcessRequestQueue.class); // initialize eventLoopGroup = newNioEventLoopGroup(); bootstrap = newBootstrap(); bootstrap.group(eventLoopGroup) .channel(NioSocketChannel.class) .handler(newLoggingHandler(LogLevel.INFO)) // The timeout period for the connection. // If this time is exceeded or if the connection cannot be // established, the connection fails. .option(ChannelOption.CONNECT_TIMEOUT_MILLIS, 5000) .handler(newChannelInitializer<SocketChannel>() { @Override protectedvoidinitChannel(SocketChannel ch) { ChannelPipelinep= ch.pipeline(); // If no data is sent to the server within 15 seconds, a // heartbeat request is sent p.addLast(newIdleStateHandler(0, 5, 0, TimeUnit.SECONDS)); p.addLast(newRpcMessageEncoder()); p.addLast(newRpcMessageDecoder()); p.addLast(newNettyRpcClientHandler()); } }); }
private Channel fetchAndConnectChannel(InetSocketAddress address) { Channelchannel= addressChannelManager.get(address); if (channel == null) { // connect to service to get new address and rebuild the channel channel = connect(address); addressChannelManager.set(address, channel); } return channel; }
private Channel connect(InetSocketAddress address) { CompletableFuture<Channel> completableFuture = newCompletableFuture<>(); bootstrap.connect(address).addListener((ChannelFutureListener)future -> { if (future.isSuccess()) { // set channel to future LogUtil.info("The client has connected [{}] successful!", address.toString()); completableFuture.complete(future.channel()); } else { LogUtil.error("The client failed to connect to the server [{}],future", address.toString(), future); thrownewIllegalStateException(); } }); Channelchannel=null; try { channel = completableFuture.get(); } catch (Exception e) { LogUtil.error("occur exception when connect to server:", e); } return channel; }
In this class, the core method is sendRpcRequest, which is responsible for obtaining services, creating connections, creating a Future task, and sending requests.
Discover services
The process of discovering services can include:
1. Pulling the service address list from the registry
2. Obtaining the specific type of service through a load balancing algorithm.
Get the address
First, implement the first step (here, caching can be used for further optimization; in this project, zk uses a ConcurrentHashMap to replace caching, detailed code can be seen in CuratorClient):
Consistent hashing algorithm is an algorithm used for data sharding and load balancing in distributed systems. It introduces the concepts of virtual nodes and hash rings to minimize the need for data migration when nodes are dynamically scaled up or down, improving system stability and performance. It is widely used in scenarios such as distributed caching, load balancing, etc.
Implementation:
Hash value calculation
First, according to the consistent hashing algorithm, we need to generate hash values based on the corresponding services. In the following implementation, the input is first passed through the SHA-256 algorithm to produce a 32-byte (256-bit) hash value.
However, such a hash value is too long and not convenient to handle, so we need to shorten it. At the same time, mapping multiple hash values to a node can improve the distribution uniformity of the consistent hashing algorithm, because each node will have multiple hash values in the hash space, which can help reduce the impact of hash space redistribution caused by the addition or removal of nodes.
The calculateHash function will take 8 bytes from the start point j of the obtained 256-bit hash value to generate a new Long-type hash value.
protectedstatic Long calculateHash(byte[] digest, int idx) { if (digest.length < (idx + 1) * 8) { thrownewIllegalArgumentException("Insufficient length of digest"); }
longhash=0; // 8 bytes digest,a byte is 8 bits like :1321 2432 // each loop choose a byte to calculate hash,and shift i*8 bits for (inti=0; i < 8; i++) { hash |= (255L & (long)digest[i + idx * 8]) << (8 * i); } return hash; }
Implement a virtual node selector.
According to the definition of the consistent hashing algorithm, a virtual node selector needs to generate multiple virtual nodes for the service and map each node to multiple hash values, finally obtaining the nearest node based on the passed hash value and returning it to the caller.
privatestaticclassConsistentHashLoadBalanceSelector { // hash to virtual node list privatefinal TreeMap<Long, String> virtualInvokers;
privateConsistentHashLoadBalanceSelector(List<String> serviceUrlList, int virtualNodeNumber) { this.virtualInvokers = newTreeMap<>(); // generate service address virtual node] // one address may map to multiple virtual nodes // use the md5 hash algorithm to generate the hash value of the // virtual node LogUtil.info("init add serviceUrlList:{}", serviceUrlList); for (String serviceNode : serviceUrlList) { addVirtualNode(serviceNode, virtualNodeNumber); }
}
privatevoidaddVirtualNode(String serviceNode, int virtualNodeNumber) { for (inti=0; i < virtualNodeNumber / 8; i++) { StringvirtualNodeName= serviceNode + "#" + i; byte[] md5Hash = md5Hash(virtualNodeName); // md5Hash have 32 bytes // use 8 byte for each virtual node for (intj=0; j < 4; j++) { Longhash= calculateHash(md5Hash, j); virtualInvokers.put(hash, serviceNode); } } }
public String select(String rpcServiceKey) { byte[] digest = md5Hash(rpcServiceKey); // use first 8 byte to get hash return selectForKey(calculateHash(digest, 0)); }
if (entry == null) { entry = virtualInvokers.firstEntry(); }
return entry.getValue(); }
}
Implement a complete load balancing method
Use the hash of the interface name and the available service list as the key to cache the corresponding consistent hashing selector. If it exists, directly obtain a load node from the existing hash selector. If it does not exist, create a new one.
privatestaticclassConsistentHashLoadBalanceSelector { // hash to virtual node list privatefinal TreeMap<Long, String> virtualInvokers;
privateConsistentHashLoadBalanceSelector(List<String> serviceUrlList, int virtualNodeNumber) { this.virtualInvokers = newTreeMap<>(); // generate service address virtual node] // one address may map to multiple virtual nodes // use the md5 hash algorithm to generate the hash value of the // virtual node LogUtil.info("init add serviceUrlList:{}", serviceUrlList); for (String serviceNode : serviceUrlList) { addVirtualNode(serviceNode, virtualNodeNumber); }
}
privatevoidaddVirtualNode(String serviceNode, int virtualNodeNumber) { for (inti=0; i < virtualNodeNumber / 8; i++) { StringvirtualNodeName= serviceNode + "#" + i; byte[] md5Hash = md5Hash(virtualNodeName); // md5Hash have 32 bytes // use 8 byte for each virtual node for (intj=0; j < 4; j++) { Longhash= calculateHash(md5Hash, j); virtualInvokers.put(hash, serviceNode); } } }
public String select(String rpcServiceKey) { byte[] digest = md5Hash(rpcServiceKey); // use first 8 byte to get hash return selectForKey(calculateHash(digest, 0)); }
protectedstatic Long calculateHash(byte[] digest, int idx) { if (digest.length < (idx + 1) * 8) { thrownewIllegalArgumentException("Insufficient length of digest"); }
longhash=0; // 8 bytes digest,a byte is 8 bits like :1321 2432 // each loop choose a byte to calculate hash,and shift i*8 bits for (inti=0; i < 8; i++) { hash |= (255L & (long)digest[i + idx * 8]) << (8 * i); } return hash; }
/** * Choose one from the list of existing service addresses list * * @param serviceUrlList Service address list * @param rpcRequest * @return */ @Override public String selectServiceAddress(List<String> serviceUrlList, RpcRequest rpcRequest) { intserviceListHash= System.identityHashCode(serviceUrlList); StringinterfaceName= rpcRequest.getServiceName(); StringselectorKey= interfaceName + serviceListHash;
private Channel fetchAndConnectChannel(InetSocketAddress address) { Channelchannel= addressChannelManager.get(address); if (channel == null) { // connect to service to get new address and rebuild the channel channel = connect(address); addressChannelManager.set(address, channel); } return channel; }
private Channel connect(InetSocketAddress address) { CompletableFuture<Channel> completableFuture = newCompletableFuture<>(); bootstrap.connect(address).addListener((ChannelFutureListener)future -> { if (future.isSuccess()) { // set channel to future LogUtil.info("The client has connected [{}] successful!", address.toString()); completableFuture.complete(future.channel()); } else { LogUtil.error("The client failed to connect to the server [{}],future", address.toString(), future); thrownewIllegalStateException(); } }); Channelchannel=null; try { channel = completableFuture.get(); } catch (Exception e) { LogUtil.error("occur exception when connect to server:", e); } return channel; }
/** * Called when an exception occurs in processing a client message */ @Override publicvoidexceptionCaught(ChannelHandlerContext ctx, Throwable cause) { LogUtil.error("server exceptionCaught"); cause.printStackTrace(); ctx.close(); }
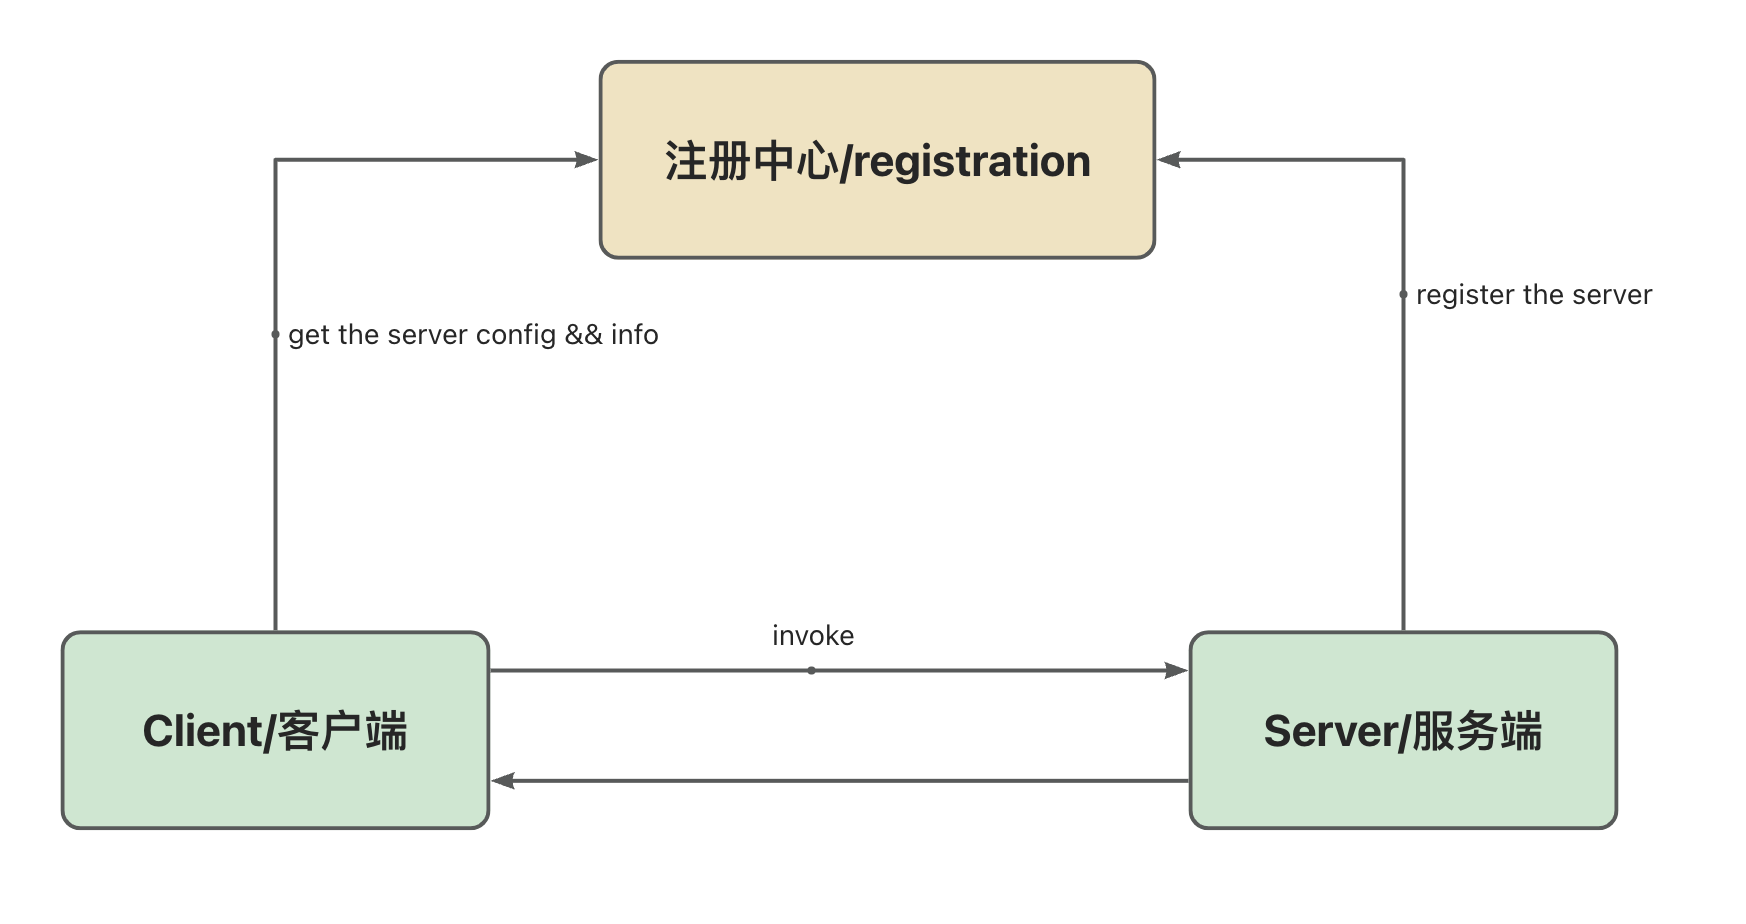
Remote Procedure Call (RPC) is a communication mechanism that allows different services to communicate and interact over a network.
Through RPC, one service can make a request to another service and receive a response, just like a local call, without developers manually handling the underlying network communication details. The RPC framework encapsulates the underlying network transmission and provides functions such as defining remote service interfaces, serializing and deserializing data.
Distinguishing RPC from HTTP:
HTTP is an application-layer protocol used for transmitting hypermedia. It facilitates communication between clients and servers. It operates on a request-response model, where the client sends an HTTP request to the server, and the server processes the request and returns an appropriate HTTP response. RPC is more similar to an architectural concept; RPC can be implemented using HTTP or TCP.
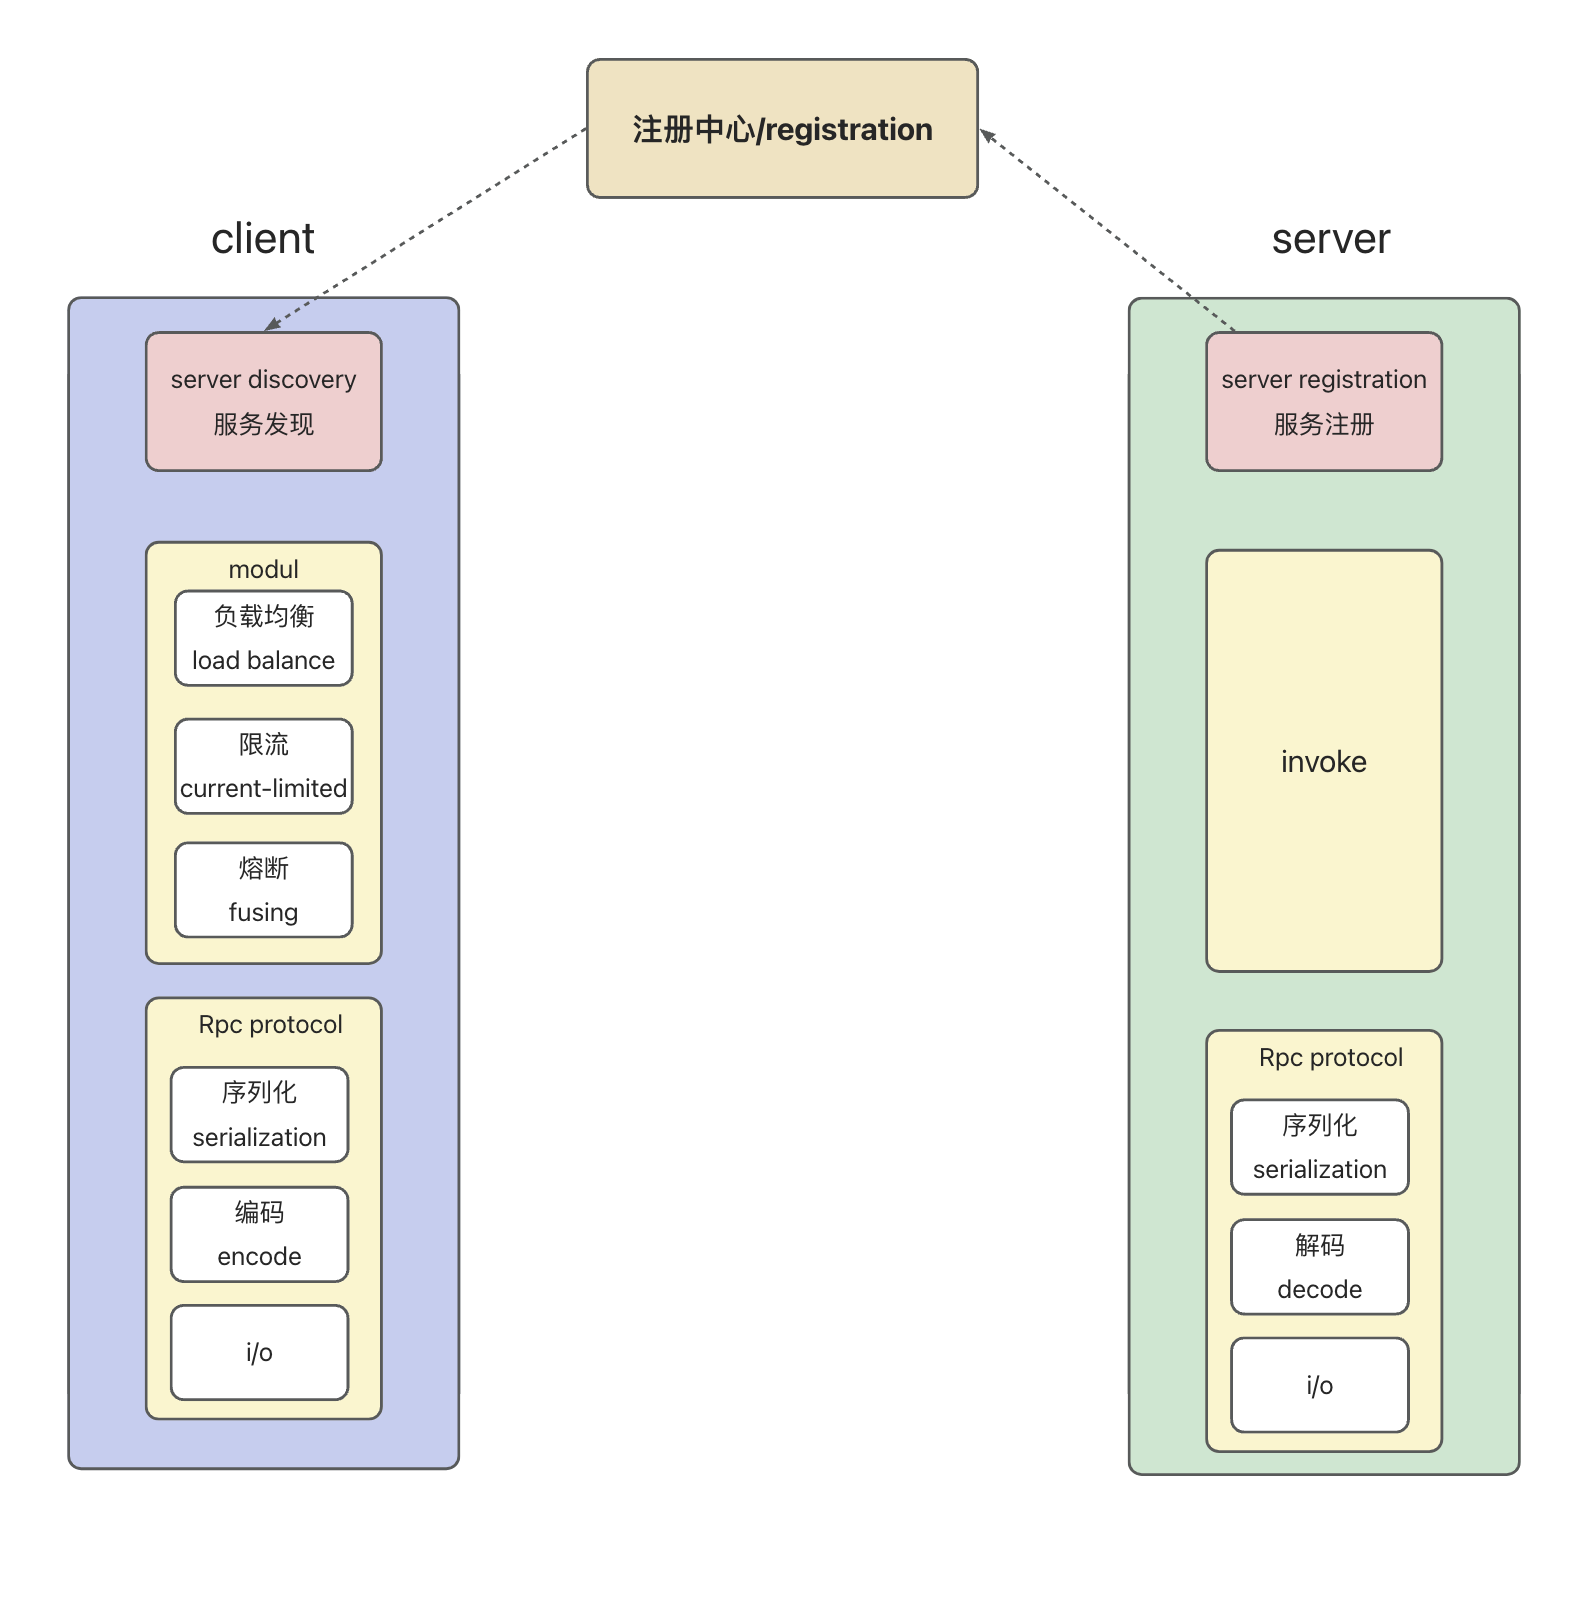
RPC Process
A simple RPC architecture is shown as follows:
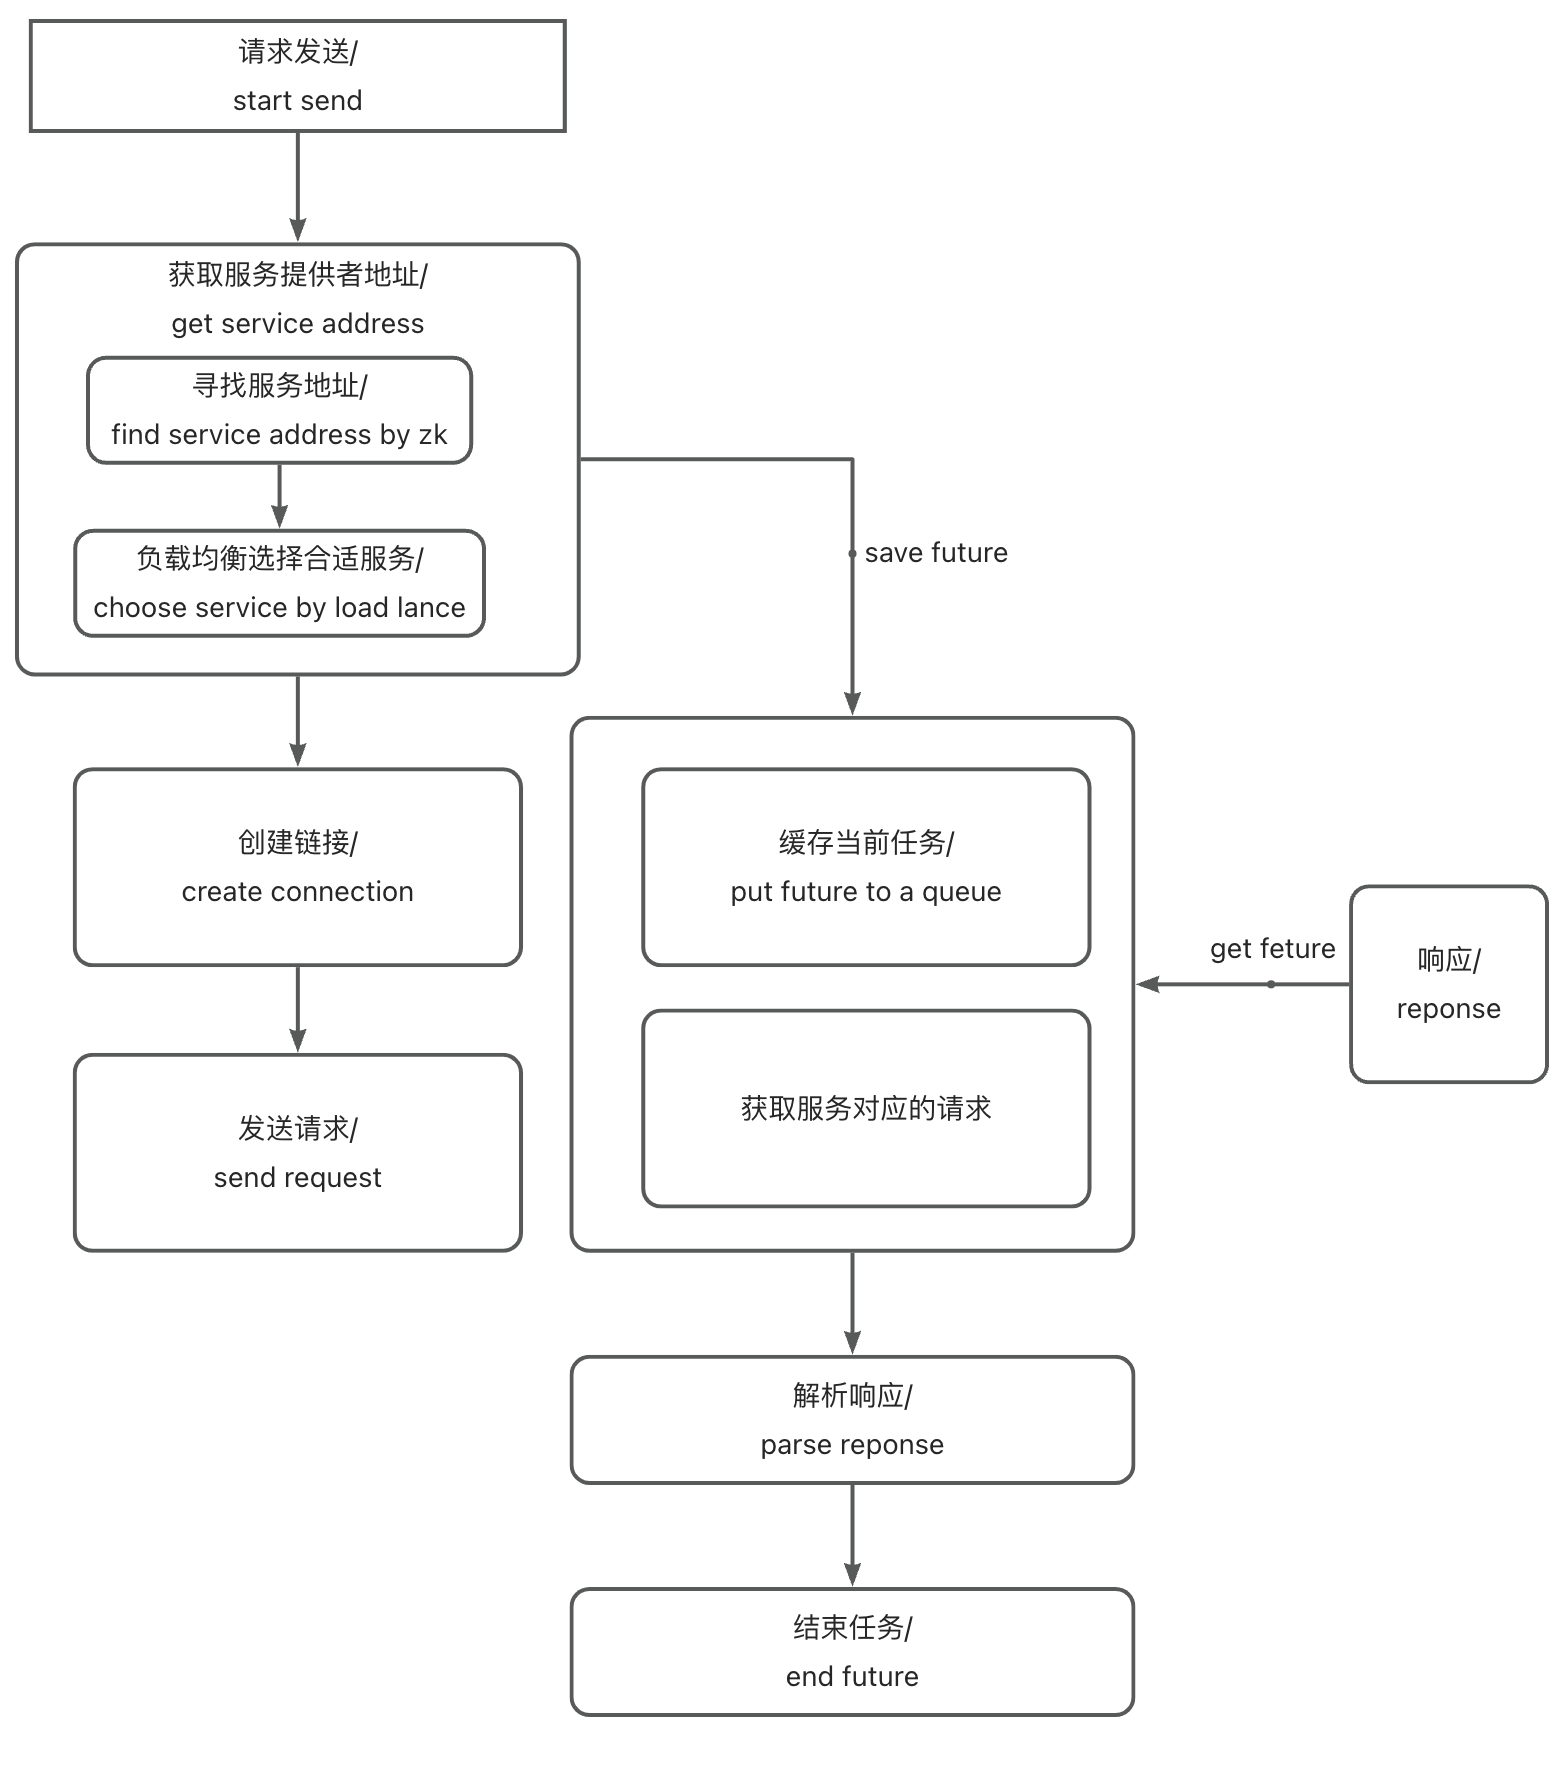
Implementation method:
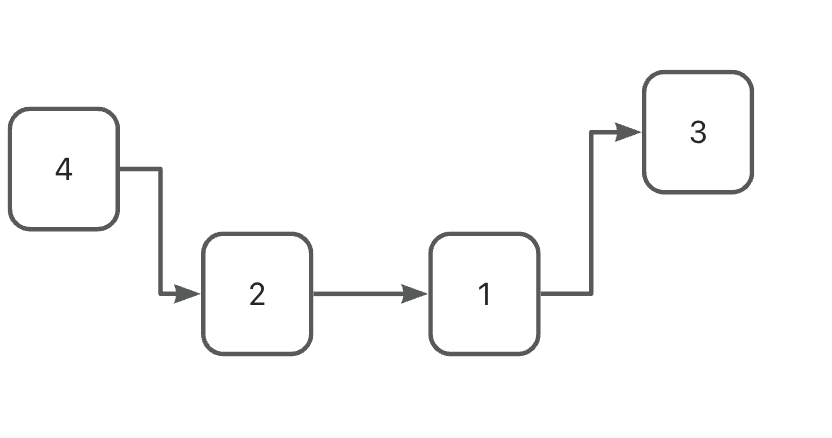
A simple RPC call chain:
Server implementation based on netty and ZK
According to the figure above, we first need to implement service registration.
Service registration:
Currently, most RPC frameworks support registration through annotations, and the same approach is used here.
This annotation will define the service version, group (to distinguish different interfaces with the same name in the same project), project name, used for service exposure.
Similarly, an annotation is also needed for consumption; an annotation to define the packages to be scanned
Register the service at startup
First, it is necessary to register the annotation with @provider
Get the package that needs to be scanned, then register the annotated bean into Spring
@Override publicvoidregisterBeanDefinitions(AnnotationMetadata importingClassMetadata, BeanDefinitionRegistry registry) { //get the scan annotation and the bean package to be scanned String[] scanBasePackages = fetchScanBasePackage(importingClassMetadata); LogUtil.info("scanning packages: [{}]", (Object) scanBasePackages); // //scan the package and register the bean // RpcBeanScanner rpcConsumerBeanScanner = new RpcBeanScanner(registry, RpcConsumer.class); RpcBeanScannerrpcProviderBeanScanner=newRpcBeanScanner(registry, RpcProvider.class); RpcBeanScannerspringBeanScanner=newRpcBeanScanner(registry, Component.class); if (resourceLoader != null) { springBeanScanner.setResourceLoader(resourceLoader); rpcProviderBeanScanner.setResourceLoader(resourceLoader); } intrpcServiceCount= rpcProviderBeanScanner.scan(scanBasePackages); LogUtil.info("rpcServiceScanner扫描的数量 [{}]", rpcServiceCount); LogUtil.info("scanning RpcConsumer annotated beans end"); }
@Override publicvoidsetResourceLoader(ResourceLoader resourceLoader) { this.resourceLoader = resourceLoader; } private String[] fetchScanBasePackage(AnnotationMetadata importingClassMetadata){ AnnotationAttributesannotationAttributes= AnnotationAttributes.fromMap(importingClassMetadata.getAnnotationAttributes(SimpleRpcApplication.class.getName())); String[] scanBasePackages = newString[0]; if (annotationAttributes != null) { scanBasePackages = annotationAttributes.getStringArray(API_SCAN_PARAM); } //user doesn't specify the package to scan,use the Application base package if (scanBasePackages.length == 0) { scanBasePackages = newString[]{((org.springframework.core.type.StandardAnnotationMetadata) importingClassMetadata).getIntrospectedClass().getPackage().getName()}; } return scanBasePackages; }
}
Register the service and related configurations before the bean initialization to ensure that the service has been successfully registered after Spring starts
Implement the specific method for service registration
To register a service, at least it should include: service provider (IP), service name, and variables in @RpcProvider, so, you can first define an RpcServiceConfig.
@Data @NoArgsConstructor @AllArgsConstructor @Builder publicclassRpcServiceConfig { /** * service version */ privateStringversion="";
/** * target service */ private Object service;
/** * belong to which project */ privateStringproject="";
/** * group */ privateStringgroup="";
/** * generate service name,use to distinguish different service,and * can be split to get the service name * @return */ public String fetchRpcServiceName() { returnthis.getProject() + "*" + this.getGroup() + "*" + this.getServiceName() + "*" + this.getVersion(); }
/** * get the interface name * * @return */ public String getServiceName() { returnthis.service.getClass().getInterfaces()[0].getCanonicalName(); }
}
Provide 2 methods, register services, and get the corresponding bean based on service names
1
2
3
4
5
6
7
8
9
10
11
12
13
14
publicinterfaceRpcServiceRegistryAdapter {
/** * @param rpcServiceConfig rpc service related attributes */ voidregistryService(RpcServiceConfig rpcServiceConfig);
/** * @param rpcClassName rpc class name * @return service object */ Object getService(String rpcClassName);
}
The registration process can be divided into 3 steps:
generate address ->
register service into Zookeeper ->
register into cache.
Here, a ConcurrentHashMap is used to cache services (the method finally calls the Zookeeper API for registration, as it is not closely related to RPC, so it is omitted, and you can refer to the source code directly).
@Override publicvoidregistryService(RpcServiceConfig rpcServiceConfig) { try { // first get address and service StringhostAddress= InetAddress.getLocalHost().getHostAddress(); // add service to zk LogUtil.info("add service to zk,service name{},host:{}", rpcServiceConfig.fetchRpcServiceName(),hostAddress); registerServiceToZk(rpcServiceConfig.fetchRpcServiceName(), newInetSocketAddress(hostAddress, PropertiesFileUtil.readPortFromProperties())); // add service to map cache registerServiceToMap(rpcServiceConfig); } catch (UnknownHostException e) { LogUtil.error("occur exception when getHostAddress", e); thrownewRuntimeException(e); }
}
@Override public Object getService(String rpcServiceName) { Objectservice= serviceMap.get(rpcServiceName); if (null == service) { thrownewRpcException(RpcErrorMessageEnum.SERVICE_CAN_NOT_BE_FOUND.getCode(),"service not found"); } return service; }
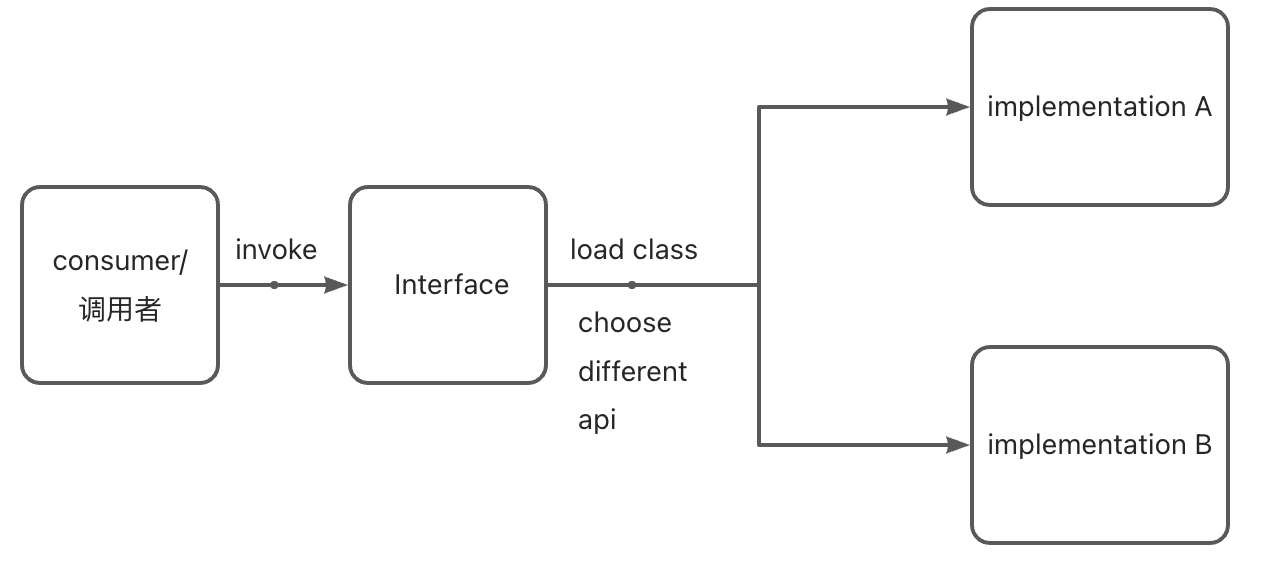
In Java, SPI stands for Service Provider Interface. SPI is a mechanism that allows applications to extend their functionality by discovering and loading pluggable components or service providers found on the classpath. It provides a loosely coupled way to enable developers to write code that can interact with multiple implementations without explicitly referencing specific implementation classes.
Difference between API and SPI
API is used to define the interaction rules and conventions between software components, while SPI is a mechanism for achieving the extensibility of pluggable components or services.
API is used to expose functionalities and features for other developers to use and integrate, while SPI is used for dynamically loading and utilizing replaceable components for implementation.
API is developer-oriented, providing programming interfaces and documentation for the correct use and integration of software components. SPI is developer- and framework/application-oriented, used to extend the functionality of frameworks or applications.
API is defined by the caller, specifying the calling methods and parameters. SPI is defined by the callee, allowing the caller to provide implementations.
Spi mechanism
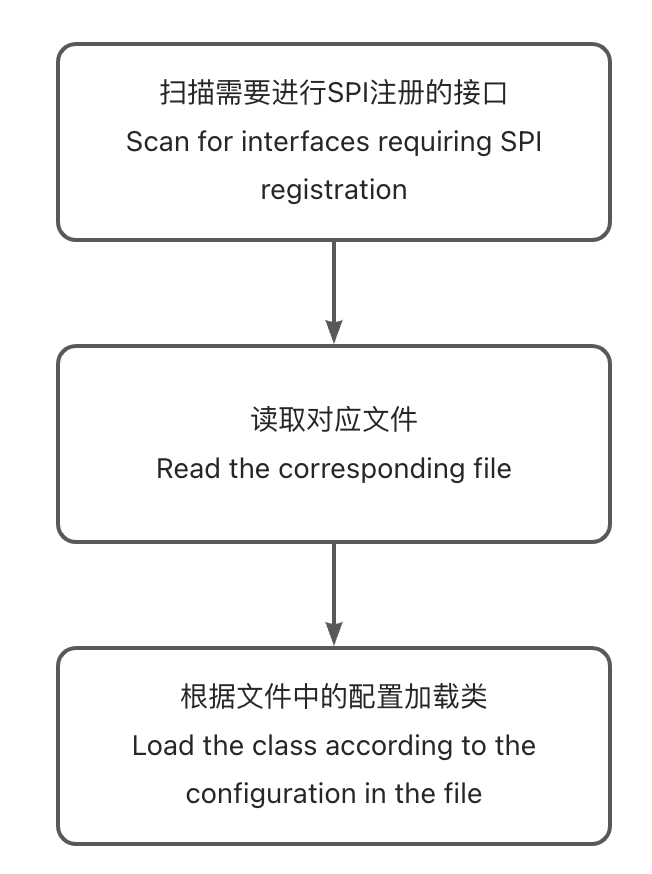
Implementation process
Implementation in Rpc
In the simple RPC framework implementation, an annotation-based SPI mechanism was implemented based on Dubbo. Here, the principle will be briefly introduced.
Implementation:
1
Define an SPI annotation to mark all interfaces that need SPI registration
Secondly, since to prevent concurrency conflicts, a wrapper class is used to wrap the instance interface to ensure data security in multi-threaded processes.
1 2 3 4 5 6 7 8 9 10 11 12
publicclassHolder<T> {
privatevolatile T value;
public T get() { return value; }
publicvoidset(T value) { this.value = value; } }
holder can serve as a lock object to ensure security.
Refer to Spring SPI, the configuration file for extensions is defined in the following format: key = ‘full path’, such as zk=org.example.ray.infrastructure.adapter.impl.RpcServiceFindingAdapterImpl
This allows for easy creation, retrieval, and invocation within the system using the key
2
To avoid issues with repeated loading and creation, a map is used as a cache. Additionally, to improve retrieval efficiency, different extension instances are cached for different services.
1 2 3 4 5 6 7 8 9 10 11 12 13 14 15 16 17 18
publicfinalclassExtensionLoader<T> { //extention path privatestaticfinalStringSERVICE_DIRECTORY="META-INF/extension/"; //save extentionloader for load different class privatestaticfinal Map<Class<?>, ExtensionLoader<?>> EXTENSION_LOADERS = newConcurrentHashMap<>(); //save all instance privatestaticfinal Map<Class<?>, Object> EXTENSION_INSTANCES = newConcurrentHashMap<>();
privatefinal Class<?> type; //save different service hold instance privatefinal Map<String, Holder<Object>> cachedInstances = newConcurrentHashMap<>(); //save different instance privatefinal Holder<Map<String, Class<?>>> cachedClasses = newHolder<>(); privateExtensionLoader(Class<?> type) { this.type = type; } }
3
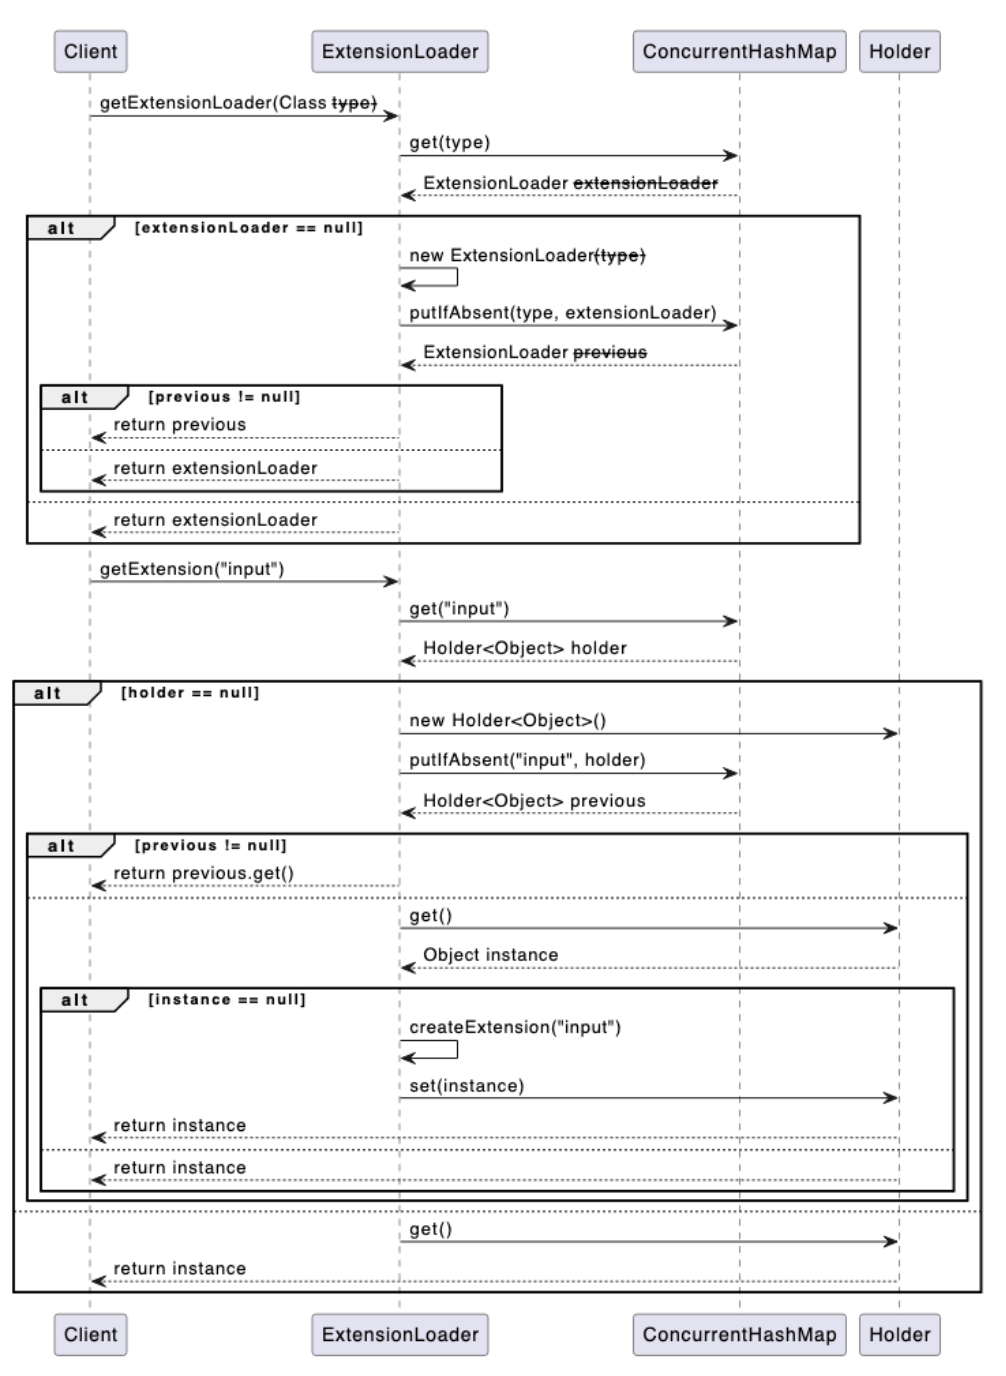
Implement methods to retrieve the classloader and getExtension
/** * generate service name,use to distinguish different service,and * can be split to get the service name */ public String fetchRpcServiceName() { returnthis.getProject() +"*"+this.getGroup()+"*"+ this.getServiceName() +"*"+ this.getVersion(); }
}
Listening for requests requires starting a netty server, used for listening to the service of the request.
First, resources such as previously registered services need to be closed upon startup.
Subsequently, resources required by Netty are initialized in order.
Below is a sample Netty startup code, where encoders and decoders need to be added for protocol parsing and heartbeat detection.
At the same time, rate limiting and request handling after decoding need to be added.
This project only implements Hessian serialization and gzip compression/decompression by default, and there are many tutorials on this, so it won’t be covered here. The specific code can be found in the org.example.ray.infrastructure.serialize package and org.example.ray.infrastructure.compress package in the source code
Encoding and Protocol
After implementing the service, we need to sequentially add encoding and processing classes for it.
Before implementing the encoding service, it is first necessary to determine the underlying encoding protocol.
Protocol
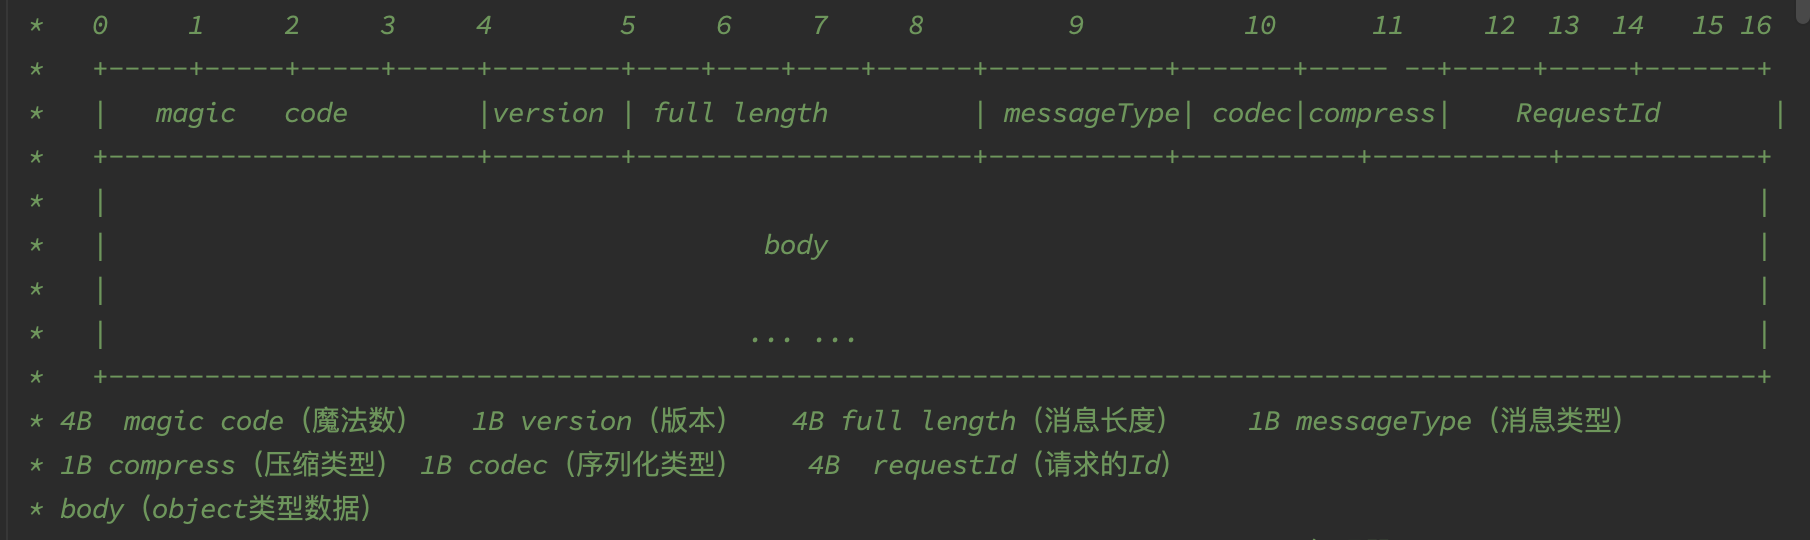
This project references some existing protocol designs and selects a relatively simple protocol design approach, as shown in the figure below:
The protocol consists of a 16-byte header and a body.
The 0-4 bytes are the magic code, used for verification.
The 4-5 bytes are the custom protocol version.
The 5-8 bytes indicate the length of the entire message, used for decoding.
8-9 define the message type, including request, response, heartbeat request, and heartbeat response.
10 indicates the encoding method
11 indicates the compression method
12-16 is an integer, representing the request number
After understanding the protocol, implement decoding
Decoding
The LengthFieldBasedFrameDecoder decoder can refer to the following article
1
https://zhuanlan.zhihu.com/p/95621344"
Based on understanding the LengthFieldBasedFrameDecoder decoder, the decoding process is actually not complex. It mainly consists of three parts: decoding the header, verification, and decoding the body. The specific implementation can be referred to in the code and comments.
The decoding part uses Java SPI, allowing customization of serialization and decompression methods. This part can be referred to in the code on GitHub, or the SPI part can be replaced with fixed serialization and decompression methods.
This project by default only implements Hessian serialization and gzip compression/decompression. There are many tutorials on this, so it is introduced here. The specific code can be found in the org.example.ray.infrastructure.serialize package and org.example.ray.infrastructure.compress package in the source code.
publicRpcMessageDecoder() { // lengthFieldOffset: magic code is 4B, and version is 1B, and then full // length. so value is 5 // lengthFieldLength: full length is 4B. so value is 4 // lengthAdjustment: full length include all data and read 9 bytes // before, so the left length is (fullLength-9). so values is -9 // initialBytesToStrip: we will check magic code and version manually, // so do not strip any bytes. so values is 0 this(8 * 1024 * 1024, 5, 4, -9, 0); }
publicRpcMessageDecoder(int maxFrameLength, int lengthFieldOffset, int lengthFieldLength, int lengthAdjustment, int initialBytesToStrip) { super(maxFrameLength, lengthFieldOffset, lengthFieldLength, lengthAdjustment, initialBytesToStrip); }
@Override protected Object decode(ChannelHandlerContext ctx, ByteBuf in)throws Exception { // get the bytebuf which contains the frame Objectdecode=super.decode(ctx, in); if (decode instanceof ByteBuf) { ByteBufbyteBuf= (ByteBuf)decode; // if data not empty, decode it if (byteBuf.readableBytes() >= RpcConstants.HEAD_LENGTH) { try { return decode(byteBuf); } catch (Exception e) { LogUtil.error("Decode error:{} ,input:{}", e, byteBuf); } finally { byteBuf.release(); } } } return decode; }
/** * heart beat handle * * @param ctx * @param evt * @throws Exception */ @Override publicvoiduserEventTriggered(ChannelHandlerContext ctx, Object evt)throws Exception { // if the channel is free,close it if (evt instanceof IdleStateEvent) { IdleStatestate= ((IdleStateEvent)evt).state(); if (state == IdleState.READER_IDLE) { LogUtil.info("idle check happen, so close the connection"); ctx.close(); } } else { super.userEventTriggered(ctx, evt); } }
/** * Called when an exception occurs in processing a client message */ @Override publicvoidexceptionCaught(ChannelHandlerContext ctx, Throwable cause) { LogUtil.error("server exceptionCaught"); cause.printStackTrace(); ctx.close(); }
privatevoid buildAndSetRpcResponse(ChannelHandlerContext ctx, RpcRequest rpcRequest, RpcData rpcMessage, Object result) { if (canBuildResponse(ctx)) { // If the channel is active and writable, a successful RPC response is constructed RpcResponse<Object> rpcResponse = RpcResponse.success(result, rpcRequest.getTraceId()); rpcMessage.setData(rpcResponse); } else { // Construct a failed RPC response if the channel is not writable RpcResponse<Object> rpcResponse = RpcResponse.fail(); rpcMessage.setData(rpcResponse); LogUtil.error("Not writable now, message dropped,message:{}", rpcRequest); } }
Given a string s, find the longest palindromic substring in s.
A string is a palindrome if it reads the same backward as forward.
Input:
1
2
3
Input: s = "babad"
Output: "bab"
Explanation: "aba" is also a valid answer.
Solution:
If this is your first time encountering such a problem, it might not be easy to immediately think of dynamic programming.
However, with step-by-step reasoning and optimization, DP naturally emerges as a clean solution.
Step 1: Naive Approach
The simplest idea is:
Design a helper method judgeIsPalindrome. Using a two-pointer technique, we can check whether String(i, j) is a palindrome in O(n).
Enumerate all substring lengths k, from large to small. For each length, check all substrings String(i, i+k-1). If a palindrome is found, return it as the result.
This works, but it’s inefficient.
We must enumerate all k values (worst case: N).
For each k, we may check up to N substrings.
This leads to high complexity, which is not feasible.
We need something more efficient.
Step 2: Binary Search Optimization
Instead of enumerating all possible lengths k, we could binary search for the maximum valid k.
This reduces the search to O(log N). (Interested readers can try implementing this approach.)
However, there’s still redundancy: each new substring is checked independently, without reusing previously computed results.
Step 3: Dynamic Programming Insight
Let’s improve by leveraging earlier computations.
Suppose for some length k_i, we already know whether every substring of length k_i is a palindrome.
Now, consider extending a substring: If we know String(i, i+k_i-1) is a palindrome, then checking String(i-1, i+k_i) can be done in O(1):
1
dp[i][j] = dp[i+1][j-1] && (s[i] == s[j])
That is:
If the inner substring String(i+1, j-1) is a palindrome,
Binary Indexed Tree and Its Applications on LeetCode
Why Do We Need a Binary Indexed Tree?
Problem Setup
Question: Given an integer array input = [1,2,7,4,3], how can we quickly calculate the sum of the first K numbers?
Solution: A common approach is to build a prefix sum array preSumArray, where preSumArray[i] represents the sum of the first i elements. With this, the sum of the first N numbers can be retrieved in O(1) time. If we need to perform K queries, the total complexity is O(K).
Making It Harder
Question: Now suppose we still want to query prefix sums on the same array input = [1,2,7,4,3], but before querying we might increase or decrease the value at index i.
Solution: If we continue to rely on preSumArray, then every update at position i requires modifying all subsequent entries of the array. That means each update costs O(N), and K queries with updates would cost O(KN).
If we abandon preSumArray, updates are O(1), but each query would degrade to O(N).
This is where a Binary Indexed Tree (Fenwick Tree) helps us balance both operations efficiently.
Prerequisite: A Binary Trick
A useful bitwise operation in this context is:
1
lowbit(x) = x & (-x)
This extracts the largest power of 2 that divides x, i.e., the value of the rightmost 1 bit.
Examples:
5 & -5 = 1
10 & -10 = 2
12 & -12 = 4
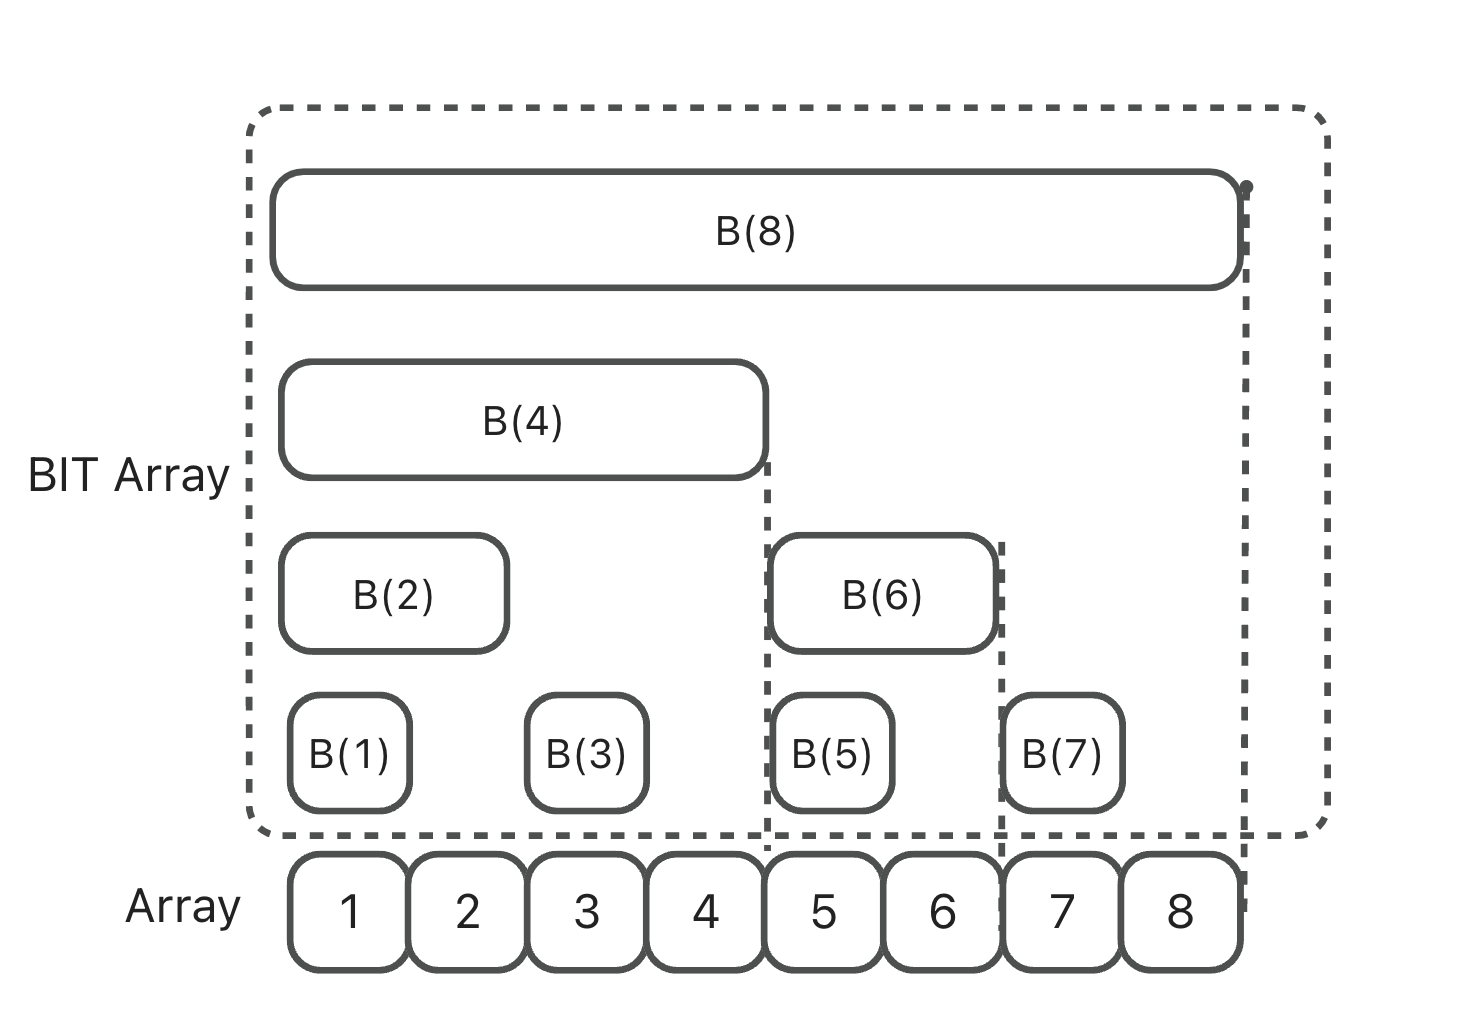
Binary Indexed Tree (Fenwick Tree)
Definition
Conceptually, it’s still an array—similar to a prefix sum array—but instead of storing complete prefix sums, it stores the sum of the last lowbit(i) elements up to index i.
You are given an integer array nums and an integer k. You can partition the array into at mostk non-empty adjacent subarrays. The score of a partition is the sum of the averages of each subarray.
Note that the partition must use every integer in nums, and that the score is not necessarily an integer.
Return the maximum score you can achieve of all the possible partitions. Answers within 10-6 of the actual answer will be accepted.
Link tables, queues, and stacks are some of the most basic data structures, and link tables are the most basic. Most of the complex data structures that follow evolved from them.
Linked list
A threaded data structure that differs from an array in that it is not necessarily stored sequentially in memory space. To ensure the continuity of elements in a linked list, a pointer is generally used to find the next element.
RandomizedCollection is a data structure that contains a collection of numbers, possibly duplicates (i.e., a multiset). It should support inserting and removing specific elements and also reporting a random element.
Implement the RandomizedCollection class:
RandomizedCollection() Initializes the empty RandomizedCollection object.
bool insert(int val) Inserts an item val into the multiset, even if the item is already present. Returns true if the item is not present, false otherwise.
bool remove(int val) Removes an item val from the multiset if present. Returns true if the item is present, false otherwise. Note that if val has multiple occurrences in the multiset, we only remove one of them.
int getRandom() Returns a random element from the current multiset of elements. The probability of each element being returned is linearly related to the number of the same values the multiset contains.
You must implement the functions of the class such that each function works on averageO(1) time complexity.
Note: The test cases are generated such that getRandom will only be called if there is at least one item in the RandomizedCollection.